Tips and Tricks

...now browsing by category


That Birthday is…Tomorrow?

Friday, March 22nd, 2013

You know you bought a birthday card for your best friend a couple weeks ago, but where did you put it? Back to the Hallmark store, then straight to the Post Office so your greeting is on time. Whew!

The next day the first card turns up in a spot you would never have checked!

What’s the answer?


Build a card file.

Once you have a place for blank notes and greeting cards alike, you will always know where to look.
  • First, find a container you love that is at least 10″ w X 7″ h, with a depth between 10-15″.


I use a BigSo™ box from The Container Store. The height is only 6.5″, but the look is clean. Right now, the blue box only is on sale for $7.99.

  • Next, decide on dividers for your card categories. You can use envelopes, cut down file folders, or use index dividers.

My cards are in clear snap envelopes, 9.5″ X 7″, also from the Container Store, $1.99 ea.


  • Finally, label dividers with categories:
     

Anniversary/Wedding                Encouragement
Baby                                         Friend
Birthday                                    Holiday
Blank                                        Sympathy
Congrats                                   Thank You
Envelopes                                 Thinking of You


Now whenever you purchase a new card or find one floating around your house, just file it for future use.

Having a designated card file means you can find what you need when you need it. You are organized. Don’t you love it!?!                                

Be Ready! September is National Preparedness Month

Tuesday, September 11th, 2012

Recently here in Central Ohio quite a few folks had to survive without electricity for over a week due to a violent electrical storm with high winds. It is amazing how many little things (lights, refrigeration, air conditioning) we take for granted that simply were not there that week.


September 2012 marks the ninth annual National Preparedness Month, sponsored by the Federal Emergency Management Agency (FEMA) in the US Department of Homeland Security. Sept/Oct is a good time for a new start in preparing for the unexpected.

There is a boatload of useful information and checklists on the FEMA website: www.ready.gov.

My purpose with this article is to summarize the three steps you should take now to be prepared for the next emergency.


Be Informed
  • Identify what types of disasters could happen to you. In Ohio, flooding is most frequent.
  • Know what your local community warning signals are and what they mean.
  • Listen to NOAA Weather Radio or local news for information and instruction.


Make a Plan
  • Develop a list of ER phone numbers, including someone out-of-town to contact following a disaster.
    • Teach children when and how to use these numbers.
  • Install smoke detectors on each level of your home.
  • Learn when and how to shut off water, gas, and electricity.
  • Know two ways out of every room.
  • Establish a meeting place
    1. immediately outside your home and
    2. an out-of-area destination in case you cannot return home.
  • Incorporate special needs for elderly, disabled and for pets.


Build a Kit

  • Prepare an Emergency Supply Kit – food and water for 72 hours, medicines, clothing, sanitation, tools.
    • Print the FEMA list for a detailed checklist to shop from.
  • Keep a vehicle ER kit in your car for accidents and emergencies while you are on the road.

These three steps are doable, aren’t they? Choose one to start with and work your way down the list. Let’s make a commitment to keep our families as safe as we possibly can.

In an upcoming blog post, we’ll look at specifics to keep in mind during and after a disaster.

Out of Sight Organizing: Storing Stuff in the Dark!

Thursday, March 29th, 2012

We want to be able to keep our stuff, have it accessible, and still have space to move around in our home or office. That calls for plenty of storage space.

Storage defined is “The place we put our stuff while we aren’t using it.”

New home buyers and organizers have this in common: we are on the lookout for multiple storage options in the houses we visit.  Some of those options are:

  • Built-ins – shelves and cupboards attached to or inset in walls
  • Storage rooms – laundry rooms or closets meant specifically for this purpose
  • Dual purpose furnishings – hollow window seats and ottomans that can hold stuff
  • Moveable storage – open filing bins and butcher blocks on wheels

If you want to have an uncluttered and airy feel in your room, this is the designer advice I try to follow:

In open storage, fill shelves about half full with a mix of utilitarian pieces and colorful accents.

     In closed storage, maximize the available space with additional shelving and containers that
corral the smaller pieces.

As much as I love the look of open storage, closed storage is my favorite!  What could be better than to have all that NOT beautiful stuff behind closed doors, in the dark, out of sight!

With the proper mix of shelves, hangers, bins, and pullouts, I am amazed at how much we can store in the smallest closet or cupboard! Also, when the door stays closed, dusting is cut by 75%. Hooray!

My request to you:  Pretend you are a new home buyer looking at your home.
Ask yourself these questions:

  • Are you satisfied with the available storage?
  • Could you find a way to store some things under beds, behind doors?
  • Is there closed storage that is not being utilized to the max?
  • Do you see empty air where an extra shelf would be useful?
  • How could you use containers to double the height of those piles without the crashes?

Get a friend’s opinion in addition to your own. If you still can’t find enough room for everything, call a designer or organizer. We want you to be healthy, happy and organized!

How to Organize: Assign Homes for Everything

Thursday, March 22nd, 2012

The tried-and-true method  we organizers use goes like this:

  1. Take everything out and sort by putting like things together
  2. Let go of stuff you don’t use or find beautiful, and move things you don’t use in this room to where they are used.
  3. Find homes for what is left.

Let’s stop at step three and camp there today. People ask me, “Martha, how do I decide where to put things? What dictates the home I choose?”

My answer is, “Think of the space you are organizing as a bull’s-eye with you at the center.”

Stand or sit where you will perform one of your main tasks. Then ask yourself these questions:

  • What supplies or tools do you use everyday?
    Place those items within the first circle radiating outward on your bull’s-eye, within arm’s reach. Counters and desk tops are prime real estate. Only allow daily use items to live there. Convenient drawers can be used to corral small things.

Kitchen – on counter: coffeemaker, knife holder, paper towels

Office – on desk: writing tools, stapler, computer, and phone, current project files

Bathroom – on counter: favorite makeup, razor, liquid soap dispenser, 5 oz cup holder

Bedroom – on bedside table: lamp, book you are currently reading, alarm clock


  • What supplies or tools do you use on a weekly basis?
    Go one circle further out on your bull’s-eye. These things should be within a step, or one level up/down from work surface, preferably in a closed cabinet or drawer. Think of your waist as best height, so choose between knees and shoulders for this ring.

Kitchen – baking pans, lesser-used utensils (those long ones with odd shapes!), plastic storage containers, towels and dish clothes.

Office desk – frequently referenced files, extra staples, whiteout, 3 hole punch, copy paper supply

Bathroom – pain medicine, extra toilet paper, replacements of toothpaste and shampoo

Bedroom – everyday wardrobe, robe, cough drops, flashlight, set of linens, extra blanket, pair of reading glasses


  • What supplies or tools do you use say… once a month or every other month?

Yep, one more ring out from the center of your bull’s-eye. Place these files, supplies, tools across the room or even in an adjacent room. You still want fairly easy access – no ladder or going through piles of boxes.

Kitchen – the crock pot or rice cooker, pantry supplies, and serving dishes for company

Office desk – reference (finished) files, book case, mailing supplies

Bathroom – linens, first aid supplies, heating pad

Bedroom – extra pillows and blankets for company, reference books, boots, seasonal clothing not being used


  • What are the things you use consistently, but only on a seasonal basis – once a year or less?

These are best assigned the highest shelf, or placement in the basement, garage or attic.

Kitchen – Christmas cookie cutters, punch bowl, Easter baskets, large coffee urn

Office – folding table, tax records 2-7 years old

Bathroom – nothing, if you haven’t used it in a year, toss it!

Bedroom – family heirloom quilts maybe? Otherwise, ditto from above.

The things you love or find beautiful can find homes on the wall, displayed on a shelf, or in an archival box to be displayed on a rotating basis with your other treasures.

If you don’t love it or use it, why would you keep it around? Give the good things to someone who can use or appreciate them and toss the rest.

Now you have a home for everything. Make your stuff go home every night. Don’t let those guys go on permanent vacation!

Product Review: Holiday Planning Tool

Friday, November 25th, 2011

Can you believe it is already the 26th of November?  There are only 29 days ’til Christmas!

OK, it’s time to decide how you will celebrate the religious holiday you embrace this season. Once you have several (no more than 3!) preferred activities in mind, you can begin to plan on menus, invitations, and gifts.

I love making lists, getting my ideas on paper. I simply refuse to try to juggle a myriad of details in my brain.

That’s why I love the ready-made lists that are available for a $20 yearly charge at ListPlanIt.com!  I have the professional membership so I can share pertinent lists with my clients.

You may choose to instantly download ListPlanIt’s Holiday ePlanner for just $7!  These are a few of the lists you will be able to access:

  • Card lists & planners
  • Address book
  • Gift/Wish lists
  • Holiday party planning pages
  • Holiday meal planning pages
  • Daily, Weekly, Monthly calendars & to do lists
  • Advent planning pages

Sometimes the lists remind me of something I had not thought of. Have fun making your lists and getting a head start on fun and relaxing holidays!

Ready, Set, Share!

Monday, November 7th, 2011

I had a wonderful time recently with 6 gals and 1 guy in my photo organizing workshop at Westerville Senior Center. It seemed fitting as we sorted memories that we met at the Everal Homestead in Heritage Park. What a beautiful facility!
As a group, we commiserated that we have more photos than we know what to do with. When I asked these questions to determine “Why photo organizing?” the group had some great answers! You have to laugh when the person sitting next to you says what you are thinking.

“What you don’t want?”

  • A hodge-podge of boxes and bins full of photos in closet, attic, or basement
  • Precious memories being eroded by those very popular, but acidic, sticky photo albums
  • Photos of vacations that your parents took with their friends
  • Not being able to find that picture you know you have when you need it
  • Blurry, dark or otherwise meaningless photos that you should have pitched 15 years ago

“What you do want?”

  • Less volume, more quality photos by choice
  • A definite order in place so you can find photos you love
  • Ability to easily share memories with friends and family
  • Know what your options are for storage and sharing photos, both physically or digitally

My next question was “Can you actually get there from here?” and the answer is: Definitely! These are the steps we practiced in the workshop.

  1. Gather all your containers of photos in one place.
  2. Choose 5-10 categories that most of your photos will fit into. For example – Travel, Friends, Church Folk, Family History, Childhood, Holidays, Work Life. Write each category on a sticky note or 3 x 5 card.
  3. Sort photos into your categories. (Attaching your titles to shoebox-sized Sterilite bins will work for this task, $1 at Odd Lots or Target.) Use rubber bands if necessary to keep specific events, dated pics together. Discard all duds, photo developing envelopes, and negatives. Keep the memories.
  4. Decide on a format for long term storage or sharing – archival quality album sleeves, scrapbooking, converting to digital on CD/DVD, archival boxes, etc.

Now you are ready to actually DO something with your photos. Here are your choices:

  • If you have lots of time, make the album, scrapbook, or CD.
  • If you have more money than time, hire someone else to do it.

If you have neither money nor time to spare, organize your categories into archival photo boxes (the modern version of a shoebox) and leave it for someone else to do when you are gone.

Whichever you choose, rejoice that you know where to find what you need and can share one box (album, scrapbook, or CD) at a time with friends and family!

Time Management : The Power Hour

Thursday, November 3rd, 2011

A time management tool I have heard bandied about lately is the “power hour.” The idea is to decide on one essential task you must get done and set a timer for one hour.

Take phones off hooks or turn down the ringer sound, don’t check email or texts, get a drink and go to the bathroom before your hour starts. Then use that hour to take a huge bite out of that task.
This works for me. I do my best thinking when I am immersed in a project. I feel like I am diving deep under the surface and don’t even come up for air.

These are two of the timing tools I like best:

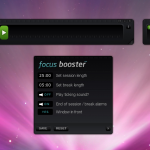
Click the image for a larger view - focusbooster.com App

Focus Booster– a free app that you download, then use as a timer on your computer. Note: when setting the time, moving the cursor to the right adds time, moving to the left gives less time.

Click the image for a larger view - Digital Hourglass Timer by Polder

Digital Hourglass Timer by Polder – This is a funky clock and timer with digital “sand” timing up to 99 minutes. Useful when you are working around the house, or as a limiting factor in meetings or workshops! Also available at selected Target stores.

Try the “power hour” with one of these or any timer you have on hand. See if it works for you. You may need some background noise if you are more of an auditory, sensing type.

If an hour is too long, start with 10 minutes of concentrated effort and lengthen the interval as you get more comfortable.

Now is also a good time to use your “power hour” to start on that thing you have been putting off for forever!